Sunday, August 30, 2009

Absinthe

I started Absinthe out of Wild Fire Fiber's June sock club offering. This one was an oceanic inspiration out of Cyrus, a cashmere blend, and the blues made me think immediately of Absinthe. LSG, a group I frequent on Ravelry, started a KAL of Absinthe, so I joined up. I typically don't do toe-up socks because of my high instep. Short row heels aren't big enough, and your average sized heel flap doesn't work either. I always get those couple of rows just after the heel that are way too tight. Absinthe is a lovely toe-up socks with a gorgeous pattern and a heel flap, so I figured, why not? As I don't usually do toe-up, I didn't quite get the construction when reading through. Once I finally figured out what was going on, I realized that to make a taller heel flap, I'd need to re-work the pattern to add more increases in some way. Of course, I didn't realize this until after I was done with the pattern and on to the heel turn, so this was way too late for me. More rows, increasing the gusset would also make a longer foot and that wouldn't fit. Another consideration is that this yarn has shown that it does not like to be frogged.

I optimistically figured that since I was already at the heel flap, I may as well forge ahead and do one repeat of the leg before deciding if frogging was necessary. After all, if I'm going to frog, adding a few yards of yarn to the frogging isn't that big a deal, and if I find I don't have to frog, life is good. Of course, now that I am nearly done with the first repeat of the leg, I switched from the DPNs to an open cable from my interchangeable needles, and, lo and behold, I cannot get the sock on. Now, should I:

a. Rip it all out?
b. Rip back to before the pattern and re-figure what needs to be done to make it fit?
c. First figure out how to add in a larger gusset, then rip back to that part?


I do like the pattern in this yarn. For re-figuring the gusset, I have two main options. First, I need to know how many more rows need to be in the heel flap to make it fit (16) and then I can either make sharper increases in the already present gusset area or start the pattern earlier, which would start the leg earlier as well. I think for a better fitting sock, I should go with the second option, which requires ripping back to before the pattern and then going from there. For this option, I'll be starting the pattern 16 rows earlier, because that's how many more gusset stitches I need and every other row adds two gusset stitches. This means I'll also be starting the leg pattern while still increasing for the gusset, and have just over one pattern repeat in the leg area before the heel flap is complete. I don't think that will look bad, in fact, I think it might look better, finishing the foot pattern lower and having the leg come up out of the foot instead of the foot joining up at the base of the let. If you know what I mean.

It's quite sad when you have to rip out 95% of a sock, about 40% of the total sock, for a problem. I guess that's one of the good things about knitting though, you can rip back if need be to make whatever it is you're knitting however you want it.

Thursday, August 27, 2009

Abstract Fiber Sock Samples


In addition to the lovely shawl, I got to work with a skein of Abstract Fiber Super Sock in Newport. Again, these are store samples for the designer to give to stores who are starting to offer the indie line. To better show off the yarn's versatility, I made two different patterns from one skein.
Pattern: Trident Lace Socks (Ravelry)
Yarn: Abstract Fiber Super Sock in Newport, just under 1/2 skein
Needles: US1.5/2.5 mm
Timeframe: June 1 - June 15 when it finally dried
Mods: None. Store sample, so pattern had to be followed to a T.
Problems: Only drying it with the major humidity we have here.


Pattern: Slippery Slope Socks (Ravelry)
Yarn: Abstract Fiber Super Sock in Newport, just under 1/2 skein
Needles: US1.5/2.5 mm
Timeframe: May 16 - June 16 when it finally dried
Mods: None. Store sample, so pattern had to be followed to a T.
Problems: Only drying it with the major humidity we have here.

I like the Slippery Slope Socks pattern a lot. Similar to the Pagewood Squiggle Socks, I really like how the cabling looks in handpainted yarns. Nice yarn, looks great up close, but as usual for these kinds of yarns, the patterns get lost from far away. Took a bit longer than anticipated, but I got them finished and sent them off to the dyer. Not too bad, if I do say so myself.

Monday, August 24, 2009

Still Stitching Away!

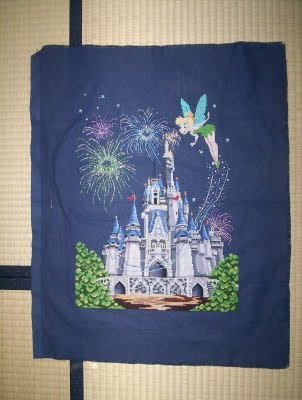
I finished the Cinderella's Castle cross stitch! This has been the longest running project I've ever had, and I'm done. With the stitching. I still need to give it a wash, block, iron, and then a frame, but I'm done with the actual stitching. This astounds me.


Of course, now I'm excited that I can move on to the next Art of Disney cross stitch, Mickey and the Fireman. That one had some dyelot issues, so will need some parts removed and re-stitched, maybe. I'm going to see if I can tell what needs to come out and what doesn't, and only remove the ones that are obviously wrong. There is one section that definitely is, but a couple of others are done using one of the possibly incorrect threads and a different blending color, so I may leave those where they are. With six ongoing cross stitch projects, three of them being Art of Disney cross stitches, the only way for me to really get down into the single digits for WIPs with the sewing, spinning, knitting, and crocheting is to get that number down. I think my stitching stash is vying with my knitting stash for most number of possible projects, and that's just because I like lace and sock yarns. In order to finish projects more quickly, I'm going to finish one non-Disney cross stitch in between each Disney one, starting of course with the furthest along, the Sled Ornaments.

I bought these things in a lot off of eBay and started them at least three years ago. They are creep-tacular. Plastic grid embroidery seamed in the shape of a sled with a thread so you can hang them. The individual pieces were mostly complete, just a few green runners and the detail work left on the sled faces. At this point, all of the stitching is complete and I'm on to the seaming. I do have two more of those green runners to cut out, but they're nearly complete and I have 3.5 sleds done. I just have to tackle those last couple of sleds and then figure out what the heck I'm going to do with them! Ah well, they'll be done, so one more long-term WIP out of the way.

Thursday, August 20, 2009

Feather Lace Shawl Sample

I've finished and blocked out the Feather Lace Shawl (Gardiner Yarn Works) sample I'd been working on for awhile. It's been so humid here, everything has taken longer than usual to dry. Socks took three days, the shawl took a few days, everything has just been moist. Since I'm sending these off, I wanted to be doubly sure that they were dry so they don't mold or anything in transit.


I've gotten some pretty nice yarns from Abstract Fiber to knit store samples out of. I got two skeins, one in Mighty Sock and one in Super Sock. The Super Sock skein went to a pair of non-matching socks, and I'll show those off in a later post. Can't use up all my blog fodder at once, I might not post again for a month! Oh wait...


Pattern: Feather Lace Shawl (Ravelry)
Yarn: Abstract Fiber Mighty Sock in Constellation, just under 1 skein
Needles: US3/3.25 mm
Timeframe: May 4 - June 7 when it finally dried
Mods: None. Store sample, so pattern had to be followed to a T.
Problems: Only drying it with the major humidity we have here.


The Mighty Sock has got to be one of my favorite yarns. It's soft, shiny, and has a lovely play of colors. I got the colorway Constellation, and might just ask for that one for both of my payment skeins. Heck, I might just have to buy another one or two skeins in different colorways! This yarn is lovely and wonderful for wraps and shawls. I don't think I'd knit socks with it, even though it is a sock yarn, because the sheen and drape are just too amazing. I'll probably knit a wrap with mine. I tossed the shawl on for a modeling session and didn't want to take it off again!

Monday, August 17, 2009

Baking!

We had a couple of parties to attend recently, one being a grillfest we threw, so I baked cupcakes and cookies. The first party was a watermelon themed party, and after seeing a few examples of watermelon cupcakes around, I had to make some! I only have one cupcake tin, and stupidly decided to make a full batch of cupcakes. I tried putting some on a cookie tin in the cupcake foils so I could cook more than six at a time, but that didn't work so well. It did, however, give me a good base for a larger watermelon cupcake cake in addition to the little watermelon cupcakes.


The food coloring is powdered not liquid here. Since I've never used powdered and couldn't read any instructions they gave due to the language barrier, I couldn't get very good colors from them. I was going for two greens, but wanted them both to be a bit darker than they came out. Not that big a deal, but somewhat disappointing. I also had a batch of vanilla cupcakes, but we're going to pretend it's because I was concerned about those who didn't like chocolate, not that I forgot to put in the food coloring and chocolate chips. I tried flour coating the chips so they didn't sink, and think that it worked for the first couple of batches. This one was from the last batch, and I think they sank because by that time, sitting around for 6 other batches to go in the oven for 20 minutes then cool so I could use the tin again, the flour got soaked through and they sank. Everyone liked them, and I'd make them again for summer parties.


I also baked cookies when I baked the cupcakes, thinking I'd make cupcakes for the watermelon party and cookies for our grilling party. Of course, with the full batch of cupcakes (I got 44), I needn't have bothered with the cookies too! These cookies are very delicious, soft, interesting sugar cookies that taste amazing with a frosting of 1/4 cup shortening, 2 cups powdered sugar, 1/2 tsp vanilla, 1/2 tsp almond, and enough milk to get whatever consistency you're going for, under 2 Tbsp. I ran out of almond after making the cupcake frosting and cookies, so bought some more, but a different brand this time. Upon opening the container, it smelled funny, but I wasn't thinking too well and poured it in anyway. We determined that the strange almond extract was not in fact almond, but coconut. It is labeled almond, but is certainly coconut. Coconut does not taste very good as a frosting for these cookies. I am still very much saddened by that, and am considering getting more almond to make more frosting to frost the rest because they are just that good with the frosting.

Friday, August 14, 2009

So Close I Can Taste It...

I've finished off a bunch of things that were on the needles, and need to get some Tunisian crochet hooks in for the next thing I want to get cracking on, so in my quest to reduce WIPs, I've gone back to my Art of Disney Cinderella's Castle cross stitch. The little ornaments I stitch are usually only 60% cross stitching and 40% back stitching, so I wasn't expecting to be able to finish it in this attempt. I did finish the cross stitches, and now just need to outline and accent.


Of course, I'm posting this later than I should have, so at this point, I've outlined everything in the castle with black thread, finished the red of Tinkerbell's mouth and am mostly done with the black outlining for her, and just need to do the bronze wand and castle accents, as well as the stars around the fairy dust trail in the castle. For some reason I didn't do those when I was doing the stars in the sky. I've also fixed any errors I've found, an uncrossed stitch here, a missed stitch there, an obviously wrong color stitch that shows up because of the outlining, threads that weren't actually secured when I did them the first time (only the shiny slippery fireworks though), things like that. It will definitely need a good wash, block, and maybe iron when it's done. There's a good number of lines from the hoop and a couple of spots that aren't as clean as they should be, but a dunk in a cool bath with some Soak and then being pinned out to dry should fix that!

The back stitching is going very quickly compared to how fast I thought it was going to be. I suppose the major difference between this one and the ornaments is that the ornaments are so small you're outlining most stitches, whereas with this one, you're not really doing so much. It's going much, much faster than I anticipated. I've been working on this thing for years in fits and starts, and figured it would take another couple of months of working on it to finally get it done. Nope, it's been 10 days since I took that picture, and I may just finish it today! Woohooo!

Then the question will be if I can count it as finished before I hang it or if it needs to be framed and hung first, since technically that's part of finishing, but I don't know if I want to get it framed while in Japan, or maybe I should because we'll be framing diplomas as soon as my new ones get in, or.... Either way, I'll be able to go on to the next cross stitch, and for some reason that makes me happier than the fact that I'll have a finished one. As Lee would say, rolling the rock back up the hill....