Thursday, October 21, 2010

Now with (somewhat) Less Fail!

I finished the Laceless Millicents, and promptly wore them.  I also learned that my calves seem to be an inch smaller in circumference than when I started the socks.  I'm wondering if I'd mis-measured by about 1/4 inch, then rounded up, and have lost a bit of girth, or maybe I was measuring some odd way?  Either way, the socks are adorable, but they don't stay up.  So, I got elastic cording to run through the 1x1 ribbing at the top, and now just need to run that through and photograph it.  I just realized, I purchased white elastic...I wonder if they had black elastic and I just got the white anyway, or if they didn't have black elastic and I wasn't quite as much of an idiot, buying white elastic to run through black socks where it may show up...

I fixed the Bramblewood, got a bit further, did the other armhole edging with US8 and that fits well.  Now I need to rip out the first one and re-do it.  I've also got to decide what size to do the neckline in, either the US8 or US6.  I suppose I could split the difference with a US7...I may do that.  I'm waiting until it's a bit further along, say, at the hip increases, and with the two armholes finished so I can try it on and decide how tight the neckline should be.  I'm also lowering the decreases to 10" from the original 6".  If I were to increase at six inches, I'd be increasing at my waist, and that's just not right.  10" should do me just fine, and the total length seems like it will be good too.  Of course, I won't know until I'm there, but it's all looking great so far!

I'm working on the second of a pair of socks I can't show off yet as my walking about project, since my Millicents are finished.  No pictures of those for awhile.  Because yeah, with the amount of pictures I take on a regular basis, that'll be a hardship, right?

I'm about to switch off from the Bramblewood vest to Blaze, a sweater that was on hold in the US for the last couple of years that as of this weekend will be with me and there will be enough yarn to finish it up.  The sleeves are joined, the underarm seams are seamed, all I've got left is a few inches of yoke and the neckline.  It's so close and such a great orange color that I'm hoping to finish it up in the next week so it's ready for Halloween.  It'll look adorable with my Millicents and a nice black skirt...Fingers crossed!

Official UFO
Nearly complete!


Of course, with my interchangeable needles, I'm using nearly all the cords again, and even have quite a few projects on thread or Addis instead of the Boye cords.  That's what I want for my birthday, extra cords!  Actually, I probably shouldn't get them, it's one of the ways I keep my knitting in check.  Somewhat.  I'll be switching the Bramblewood vest to the string currently holding Blaze, then back again.  I've got at least ten hours of train riding this weekend, hopefully I can get it most of the way there, if not totally finished!

I'm over 20 projects again.  However, that will change the minute I block stuff, as one project only needs a block, one project needs a block and a ribbon, one just needs ends woven in and a block, and another one should be finished tonight, and will then just need ends woven in and to be blocked.  I have so much knitting I want to do!  I'm in "finish yarn" mode, wanting to finish projects already on the go and make all the projects I have yarn for, starting with the bulkier yarns.  Hence the Bramblewood vest and the kitchen towels.  Next up will be a re-do of the Green Day Vest, hopefully one that will fit this time!

I've been spinning a bit too, and while it's not quite at the point where I want to take a picture of the yarn on the bobbin, I've about got one bobbin done in plain white Correidale, no real technique to speak of, a highly generic beginner's yarn, that will end up being a 3-ply and hopefully knit up fairly bulky.  I want to knit the Wave Hello Cardigan (Ravelry only), a pattern to be released late November, I believe, with it.  I think it's a good pattern with just enough interesting detail to look great with some bulky handspun .

Thursday, October 14, 2010

Fail Week

This week, my knitting has been full of fail.  Epic levels of fail.  Okay, not epic.  But fail nonetheless.

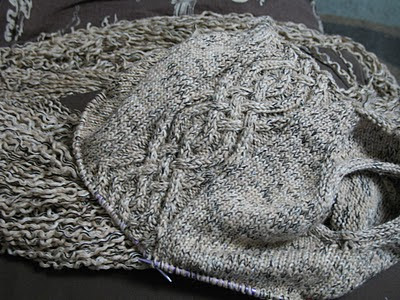
First off, I brought my work vest, hopefully the first of a few this year, to my knitting group on Monday.  I'm working on a Bramblewood, fairly simple, worsted weight yarn so fairly quick, free pattern, and uses up some 3+ year stash yarn, win-win-win-win-win.  I was working on the I-cord edging for the armholes so I could maximize yarn.  Also, this way I was able to leave the yarn attached and not have multiple ends to weave in and was really slick about it.  However, in following the directions and switching to a US6 from a US8 for the edging, I made it entirely too small.  I can in fact fit it up on my arm, but add a shirt and I'm sure the circulation would be cut off by the end of the day.

Bramblewood Fail

Next fail was the second laceless Millicent Sock by Cookie A.  The first sock is lovely, finished, though I may run some elastic through the top as it fits amazingly but is tall enough to want to sag a bit during use.  I found this out while wearing it all evening after finishing it, with one leg of my lounge pants rolled up to show it off all night.  Lee thought I was hilarious and insane.  Anyway, the second sock.  I made it to the heel turn, and realized that I had two more stitches on the purl side than the knit side, and followed the directions correctly.  Crap.  In looking more closely at the heel flap, I realized that I had only 42 stitches, and while that may be the answer, it was not the number I was looking for in this case.  Rip and re-do.  In some cases I may have fudged it, but with this pattern, that was not something I wanted to do.  I hate messing up a heel flap, mine are always 48 rows due to my high instep instead of the typical 30 - 40.

Now with correct heel flap!

Finally I (hopefully) finished up my week of fail with another error on the Bramblewood vest.  You can see this one in the picture, kind of.  The final set of cables, at the widest point, is supposed to have an odd row where you knit the knits and purl the purls, and I went right on to cabling back towards the center.  So, instead of a lovely curve, there's a point.  I was considering ripping down and re-doing only the cabled panels, but I think it'll look better in the end and be less of a hassle to just rip the whole thing back and re-do.  It's all in the round with stockinette in between the panels, so not that big.  Three inches is kind of annoying though, even if it is in worsted weight yarn with only six rows to the inch!

Monday, September 27, 2010

Dinner!

I made a lovely dinner and just wanted to share.  First off, my chicken was browned so nicely that I had to take pictures:


I made Chicken Parm-ish.  No real cheeses to speak of, so I shake some canned Parm over the chicken before putting the sauce on it, then sprinkle some shredded cheese product over the top.  Pretty good for Japan.  The nice browning of the chicken made me very happy.

Secondly, I made Apple Pie-rate Ships for dessert.  They were quite delicious, though a bit more work than I'd do on a regular basis, and went over quite well:


I'm pretty sure I'll end up making these again, just not any time soon.  The color would likely have been better had I actually used the recommended egg wash, but that was just one step further than I was interested in going.  I made apple crisp the next day with the leftover apple filling.  I could have put more into the pies, but I didn't want to overfill them so I skimped.  The apple crisp was delicious though!

Thursday, September 16, 2010

Nuno Felting

I showed my friends who got married this summer a Flicker set of all kinds of shawls because they expressed interest in a shawl for their wedding.  Both liked the Nuno felted variety rather than a knit version, which is what prompted the major blanket projects.  Nuno felting is a great technique, but the work put into it is nothing like the work put into a knit piece.

I bought some cotton and some silk, along with some netting, in the local craft store.  Cotton was to test the method, the silk was for the actual shawls.  I didn't realize until I tried the test scarves that the cotton I'd bought, while it was the correct open weave style and able to be felted, was in fact iron-on interfacing and therefore not useful for felting.  The interfacing caused a blockage and attempting to felt gorgeous wool onto that just didn't work.  I tried tossing it into the washer with the towels I was washing to see if that'd make it work better.  It didn't:

Fail
After the "learning experience", I decided to just go with the natural white Correidale roving I have and the silk I bought.  Here's a step-by-step of what I did:

Step 1

First off, I laid out my bubble wrap and the silk on top of it, to measure out the area and make sure I had enough bubble wrap.

Step 2
Next, I placed a fanned-out piece of roving under the fabric at each corner to mark the boundaries of the silk.  As my silk has raw edges and I didn't want to play with seaming anything, I decided to make a felted border all the way around to encase the edges.

Step 3
Once I had the corners marked, I filled in the outline of the silk by fanning out bits of roving.  I pulled off a chunk of roving, never very precise, just a rough handful, and fanned the chunk out to form 90 degree angles for the corners and 180 degree edges for the sides of the fabric.

Step 4
Then I filled in the design.  I decided to keep going with the fans and place fans of roving semi-randomly inside the border.  I can't do real random easily, so it's actually got a pattern.

Step 5
Now I replaced the silk on top of the bottom layer of roving.  The roving should extend slightly outside of the actual edges so that the raw silk is fully encased and won't fray or fall apart.  I fiddled with the edges a bit until it was how i wanted it.

Step 6
Once the bottom layer is the way you want it, it's time to add a top layer.  For this one, I tried to match the bottom layer exactly so that the pattern was intact and there were bits of non-felted silk as well.  As I pulled off the roving and fanned it out, I played match-the-fan and tried to get them as similar as possible to the ones underneath.

Step 7
Woohoo, it's all there!  Now that I have a full top and bottom layer of felt to laminate the silk, it's time to get down to business.  Everything needs to be covered by netting so that it doesn't stick to itself in ways you don't want it to.  The netting also helps create a rough surface to felt against.

Step 8
This is the part where you wet your surface with soapy water and rub it in to start the felting process.  Many places recommend cold water to better control the felting and rubbing with plastic bags over your hands to help kickstart the felting.  I decided to use hot water to start the process faster and instead of squirting the water onto the fabric and rubbing with plastic bags, I drilled some holes into the cap of a 500 mL soda bottle, filled it with the hot soapy water, and used that to both apply the water and rub it in.  It worked very well.

Step 9
Now you roll up the bubble wrap and roll it roughly 150 times.  Keep a towel handy, excess water tends to escape.  Then you unroll it, roll it up from the other direction, and roll it roughly 150 times.  Then, you take off the netting and flip over your piece, and repeat.  Keep doing this until you think your wool is felted.  One way to test if it's felted enough is to pinch up some of the wool.  Instead of individual fibers coming apart, it should form a tent because it's bonded to all the surrounding fibers.

To finish, rinse the soap out with cold water to shock it into a bit of a stronger felt, then crinkle it up into a ball and throw it against a surface (like the bathtub bottom) a few times until it feels as stiff and has wrinkled up the way you'd like it.  After rolling it will still be flat, but some of the appeal of Nuno felting is the wrinkles the felted bits give to the open silk.  Roughing it up after rinsing out the soapy water gives it those wrinkles.

Step 10
Hang dry.  You may want to do this in the shower because it will drip, no matter how well you've squeezed out the water.  Bask in the glory of your completed wrap.

Step 11
Make a second, and realize that this is a lot faster and easier, though more work-intensive, than nearly any knitting project you've ever made.  For a full-sized wrap.  Decide this is probably what people will be getting for Christmas, plan to order a bolt of silk plus some finished-edge scarves from Dharma Trading, and wonder if you should also get more roving.  Because two pounds of white plus six assorted colored rovings and a small bag of black aren't enough, right?

Step 12
Show off your completed wrap.  It's awesome and soft and lovely.  It's not quite as white as I was hoping, due to the fact that the wool I used is naturally, not artificially, white, so has a slight off-white, almost yellow tinge.  They're still gorgeous and I know at least the first bride loved hers.  I hope they'll be not only useful but also used.  I need to make one for myself now too.  I may order some black silk too, maybe an 11-yard bolt of each, and have some friends come over and felt as well.  This is a really fun technique that produces some really cool results, and is quite simple for the final product.  Each of these took an afternoon, and I could have gotten them both done in one day.  I can even do two scarves at once with the same setup.  I do believe that I shall do a bunch of Nuno felted presents for my family this year.  The only question is should I do scarves or shawls?  Or scarves this year and shawls next year if people like the scarves?  Hmmm....

Monday, September 13, 2010

Baby Gifts!

FO pictures and a not-so-FO picture.

I knit some gifts for two colleagues that are having babies. I knit a bunting and a pair of booties for each. I was going to knit a matching hat, but that didn't turn out so well. The hat was knit out of the same yarn as the bunting, and I was going for the same striped effect, but either I have no concept of what a baby's head looks like, the pattern I followed was for a bigger baby, or my gauge was way off. The hat, or at least, the bit of ribbing and stripes I knit, fit on my head. Sure, it was very stretched out, but it still fit on my head. This leads me to believe that it would be too big for a newborn and wouldn't be worn with the buntings it matched. It soon got frogged. This was also a good thing because I would have had to go back to the craft store for more white had I knit the striped hats too. I probably could have exchanged one of the two extra skeins of grey I bought, but I still would have had to go back and deal with that.

I chose to knit a Comfy Angel's Nest because the worsted weight would make a quick knit, and I just thought it was freaking adorable. I'm not sure what sex the babies will be, so I was looking for a tan and white combination. The only browns they had were dark brown that wouldn't quite be right for a girl, or a puke tan that isn't right for this decade. I went with the only neutral pairing they had, a light grey with white stripes. Well, the only neutral pairing in the only decently inexpensive machine washable worsted weight yarn they had. It turned out pretty well, in my opinion. I love these little bear buttons! I was torn between white and brown, but the white seemed to disappear even though the brown isn't the best choice for it. It works, and I'm pretty pleased with the result.


Pattern: Comfy Angel's Nest (Ravelry Only)
Yarn: Wister Jolly Time II, two and a bit skeins of grey, less than half a skein of white.
Needles: US8/5.0 mm
Timeframe: Both were knit between October 20th and November 7, 2009 - would have both been finished by the 1st had I not been sick and then stalled on them!
Mods: Lots, actually. On Row1, instead of P2, I did a K2tog and kept only one stitch in between each row, changing to a knit instead of two purls. I don’t like the look of a seam where there isn’t one and the purls would pull the knit stitches in so would be better substituted with K1 than K2. 3 stripes instead of 4 because 4 is an unlucky number in Japan and the mothers are Japanese. For the sleeves, I picked up two stitches from the body at the underarm, knit them together, and knit that stitch together with one of the stitches next to it so there wouldn’t be a hole. For the sleeve cuff, I knit all for the first row of the CC to make a smoother color transition. For the second one, I did the sleeves right away instead of waiting until the body is done. Much faster and easier to do it when you only have the top of the bunting and not the entire thing hanging off of your DPNs. I put the cord into the eyelets before closing the hem so I wouldn't have to pull it through afterward also. I knit the body to 17.5” for a final of approximately 18” instead of 16.5”.
Problems: A couple of errors were found in the pattern, but nothing I didn't catch right away. I believe Row 1 should be: Sl1, K5, M1, P2, M1, K4, M1, P2, M1, K18, M1, P2, M1, K4, M1, P2, M1, K6, and the Final Increase Row should be * K8, M1 * to last 8 sts, K8 for 98 sts.

I am particularly pleased with the small details on this piece. Lovely matching M1Ls and M1Rs for the raglan shoulders, getting rid of the color change purl dots with a knit row instead of ribbing at the cuffs, and some beautiful KLLs for the Final Increase Row really make the bunting look good. I used a YO bindoff for the button bands so that they didn't pucker in. For this project, I did make knots when I changed skeins or colors so that if the woven ends do pull out someday, they'll still be attached. I also used the overcast method to weave in the ends as I went along. I find this piece to really be a bit of a work of art with all the little details.


I also knit a pair of Sneaker Booties for each. It's an adorable little pattern, and I was looking for a nice light blue like in the pattern picture, but the green yarn was a good price so I went with that, figuring it was decently gender neutral. I find it amusing that I went with the patten colors for the bunting when I wasn't looking for that, and when I was looking for the color shown in the pattern, I couldn't find it. Ah well, at least I found decent yarn! I'm not too pleased with how it came out. The booties will probably look good on little feet, and I put a dot of glue on the tied laces so they won't come undone, but the soles of the booties are obviously done with a thinner yarn and that isn't so hot. I'm so pleased with the bunting that I'm not going to complain about the booties and I'm sure that they'll like them anyway, but it's just one of those things. If they had a white in the sport weight yarn I got, I'd definitely have purchased some of that too, but alas, they did not.


Pattern: Sneaker Booties
Yarn: Wildfoote Luxury Sock Yarn in White, bits of a skein that's been used twice already before, and about 1/4 of a skein of Wister Color Palette in green, a sport weight yarn
Needles: US2/2.75 mm, DPNs
Timeframe: October 29 - November 5 for two pairs, would have been done in 2 days but I stalled from being sick.
Mods: None.
Problems: Not really, I'm just not all that pleased with how the sole looks on these.

Saturday, September 11, 2010

Continuing the Trend

I was going to wear my hip scarf, which I love and have worn probably too often, but one of the beads popped off when I went to tie it. Oh no! I thought, I don't want it to unravel, must add this one to the pile o' stuff to fix!


However, when I went to fix it, I found that not only had that one bead popped off, but an additional five had popped of when I wasn't looking. Apparently, these beads don't stay on very easily! However, the merino used seems to be holding together quite well (and pilling a bit too) so I'm not that worried about it. I may put some Fray-Check or something on it, just in case, but I'm sure the other beads have been missing for quite some time and I'm just noticing it now.


I think this would be better in a non-animal fur version, so it looks crisp longer (no pilling!), and one of my friends is about to make one in some luscious cotton laceweight from Avril, the Japanese home of Habu. I may have to get me some of that next time I'm in Tokyo for one of my own!

Thursday, September 9, 2010

Darn It!

If socks were good enough to take the time to knit in the first place, they're typically good enough to take the time to darn them to extend their life. I have two pairs of every-day wear socks, socks that are in sturdy enough yarn to not worry (much) about wear or machine washings, and not in work-specific colors. Both pairs are in need of patching so I can continue wearing them. I also should use some of that sock yarn I own...more socks are never a problem!

The first one was knit for me in a swap. The Monkey pattern, in, ummm...I forget. I looked through old blog entries to see what it was, and remembered that I wanted to make some Thelonius in black for work (I may just do that...), but couldn't find the yarn. I think it was Cherry Tree Hill, but it might have been Socks that Rock. One of those two big ones. I think CTH.  Yes, found it in the comments, Cherry Tree Hill! Either way, I don't like it; it pills a lot and looks really old and washed-out. It's also knit a bit loosely for my tastes, and I'd considered ripping it out and re-knitting when I first got them, but am glad I didn't because I've worn them quite a bit and do enjoy them as-is. I noticed a split stitch in the heel awhile back, but never reinforced it. It broke, and just needed a simple 5-stitch graft using some gorgeous Indigo Moon, as it's the closest color I have. I again considered frogging to re-knit, but I have more than enough sock yarn now, and the yarn doesn't seem all that pretty anymore. Darning it is a lot faster and easier than ripping to re-knit!


I knit my socks fairly tightly, but not tight enough for Dream in Color Smooshy, apparently, and I managed to wear through both bottoms at the same time. It was a couple of years of near-weekly wear, so I'm not complaining much! I was thinking I should reinforce it (noticing a pattern?), because reinforcing is always better than darning a hole, but I never did. Instead of trying to darn a fairly large hole with quite a bit of open ends, I'm knitting patches on them. It's not that I couldn't darn them, but it would take awhile, and since I have to use a different yarn anyway, as long as the patches don't bother me while walking about in them, it's good to go.

Sock (or any other garment) patches, step 1:


Pick up stitches below the hole. The best way to do this is to pick up the rightmost leg of each stitch, so that the join is nice and flat. Depending on yarn size and how worn the yarn around the hole looks, pick up from at least two rows below the hole. I picked up stitches on the third row under the hole.

Step 2 (optional):


Because the yarn was so worn, I used some Fray-Check to help prevent further degradation of the original sock. If those ends unravel enough, the patch will fall off anyway, and that is undesirable.

Step 3:


Choose your yarn! I didn't have any leftovers, I'd sent them to a friend who was making a sock yarn blanket. I wanted a yarn that was similar to the yarn I was using in feel, thickness, and hopefully color palette, and definitely washability. I chose the yarn on the left.

Step 4:


Knit a patch. Knit across the row you've picked up, joining the yarn in whatever way suits you. You should be knitting one patch row for every sock row. Knit (or purl) the first and last stitch of every row with the one it's on top of on the sock, again picking up the rightmost leg of the stitches. You're joining the patch as you go, instead of making a patch and sewing it on afterward, making for a smoother join and less finishing, woo!

Step 5:


After you've knit a couple rows past the hole, graft the patch closed. Follow the stitches of the row above your patch to graft it to the next row, as if the graft were another row of stitches. It's really like duplicate stitching, except you're stitching into the live stitches.

Step 6:


Wear with pride, enjoying your sock for as long as possible before you absolutely must throw in the towel and throw away (or frog to re-use) your lovely socks.

I've worn them a few times now, and I was worried that I'd feel the patches and be unable to wear them. Of course, your mileage may vary, but for me, I feel them when I'm walking around the house in only the socks, but not when I'm wearing them with shoes or slippers.  I'm happy with them!